 In the redesign of the Colt pistols in the 1858-1861 time period Colt came out with stream-lined versions of the .44 "Army" caliber, .36 "Navy" caliber service pistols and moved on to the pocket guns such as the 1849. The other major design feature of these guns is a ratchet loading lever designed to ease loading of the bullet. Improvements in materials had also permitted the smaller cylinder and overall lighter gun in the .44 1860 "Army" revolver by means of using the rebated cylinder on the basic 1851 sized frame. This technique was applied to the 1849 in increasing the caliber from the rather anemic .31 to .36 caliber. Thus the 1862 Police and Pocket Navy were born.
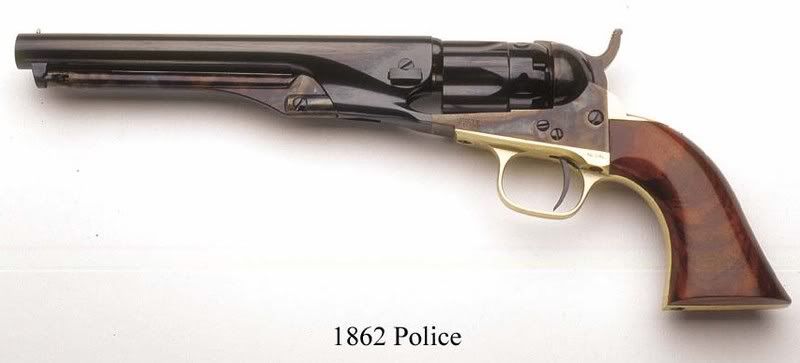
Produced concurrently and apparently in the same serial number range with the Pocket Navy (with it's octagonal barrel and old style loading lever), this 1862 Police revolver set the standard for quality. Approximately 28,000 were produced. Barrel lengths were 3½, 4½, 5½ and 6½ inches. You might not think of this as pocket size but pockets were different then. Still, the 5½ and 6½ inch guns might have been better carried in a holster. I'm sure some few found their way into various hiding places in the home. Originals can now sell for $2,000+ depending on condition and provenance. A reproduction is a much better choice for a shooter.
 Finding a shooter isn't much of a problem. Colt's guns are all so popular that reproductions have and are being built by several companies including the world renowned Uberti firm. This particular revolver is an Uberti and has the 6½ inch barrel. It seems a good copy of the Colt. I would have preferred a 4½ inch barrel but that length is no longer in production. The guns are petite. Very much so. In grip size they are comparable to Ruger's Bearcat and, in today's world, they can serve much the same functions. I think it is about ideal in size for a trapline gun, for training young shooters, or for introducing young shooters to blackpowder/percussion revolvers. As things are now, it is pretty cheap shooting but gives a young shooter familiarity with slightly greater recoil (which can be managed by adjusting the powder charge) and with how the components interact.
 Of course, some accessories are necessary with a "cap 'n' ball" revolver. First, one must have a nipple wrench. The Uberti guns no longer ship with a wrench (as I believe they once did) and you have to get it separately. You can get the appropriate wrench from Dixie Gun Works (among others). Another need is some method of carrying and measuring powder. A flask does this in one go and works well in loading the revolver. Cleaning tools and materials for the .38 Special will work and are no great trick to find. A holster can be a different story.
Every handgun needs a holster and this was really the first thing I went looking for. It wasn't hard to find a maker for a flapped holster. However, I didn't want a lot of excess bulk and feel that a California or Slim Jim style would be both very usable and very period appropriate. Unfortunately, they aren't easily found. Nearly every possible maker is a custom proposition. However, Dixie does have a Slim Jim for the 1862.
Loading the guns is no great bother. Despite the trouble Rooster Cogburn had (and he should have known better as "cap 'n' ball" guns were much more common in the west than you might have been led to believe) it is easy peasy so long as you follow some rules.
#1 is to thoroughly clean the gun of oils. It is particularly necessary to remove any possible petroleum products from the nipple, chamber and barrel. Again, thoroughly clean to avoid contamination of the powder charge.
#2 is to use only blackpowder or proven substitutes in these guns. I often hear stories of shooters using smokeless powder and wrecking guns. I'll be using Pyrodex P to save my BP for another gun but Triple 7 is usually easy to find.
#3 get the proper size cap. Remington #11s fit my pistol right well.
#4 use the proper size ball. For .36 caliber percussion revolvers a .375" or .380" ball is correct. These are the guns in which our .38 cartridges began their evolution and the groove diameters make them .38s. Hornady makes a swaged ball which I prefer since I can save my casting time for other things. However, one can get molds and cast your own bullets if you prefer. Given today's political climate, you might want to have that option.
Once you have the readies in position, loading is, really, simple. I fire a round of caps through the gun to ensure that the nipples are clear and dry (from the last cleaning). The revolver is brought to half-cock and the cap residue is removed from the nipples. Each chamber is charged and a ball then seated before moving to the next chamber. One chamber is left empty to provide an empty nipple on which to rest the hammer. Then, all chamber mouths are filled with a lubricating and protective grease. There are many products which can be used including Wonder Lube. Whatever you use, be aware that many appropriate lubes will melt in summer heat. That usually isn't a good thing. The revolver is now ready to fire.
These guns use a notch in the hammer nose as the rear sight and it can move around a bit. I believe Elmer Keith shimmed the sides of the hammer to prevent this in his guns.
As one would expect, ballistic output isn't all that great. Still, the guns have their uses and they are certainly interesting.
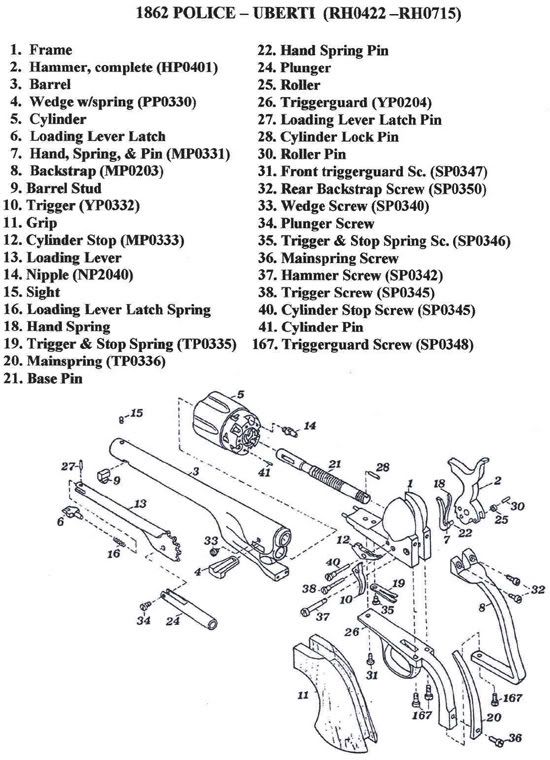
Perhaps I'm in the minority but I consider cleaning these guns a snap. Every step presumes an UNLOADED gun. First, push the barrel wedge out, right to left. It will be prevented from falling completely out by the wedge screw. Pull the barrel off the front of the frame. You might have to wiggle it a bit, particularly on a new, tightly fitted gun. Place the hammer on half cock and slide the cylinder forward off the base pin. Remove the nipples. This is all the disassembly required for normal cleaning.
I like to use HOT water for cleaning but some BP substitutes such as Triple 7 purportedly don't require it. I have a small bucket of hot water into which I place the cylinder and nipples. With a tight fitting jag and patch combination, I place the the barrel into the bucket muzzle first and swab from the breech end. After thorough cleaning I place the breech end of the barrel about 1-2 inches into the water and scrub all exposed surfaces clean using a toothbrush. This usually only takes a minute or two. I lay the parts on an old towel (do NOT use the wife's best towels for this!) and spray with WD-40. I then put the bore swab and toothbrush to work on the cylinder and nipples. The nipples also get the flash hole scrubbed with a pipe cleaner. All parts get laid on the towel and sprayed with WD-40. The receiver is scrubbed with the wet toothbrush and then wiped clean with a towel or T-shirt and WD-40. All parts are then wiped dry. The base pin is greased (do not use a grease containing a petroleum product) and the gun reassembled.


No comments:
Post a Comment