Wednesday, February 25, 2009

Hard rubber buttplate repair by Marlinman93

This will hopefully help fix those broken hard rubber buttplates on early Marlins, (or whatever brand). Of course you can buy repros, but then you've got a glossy black buttplate that just doesn't have the look of an original. The following repair will work on black plastic too, if you can't find a new replacement.

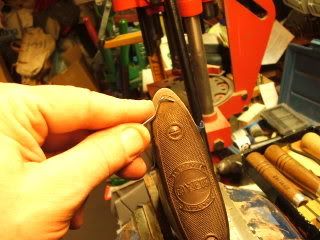
This buttplate is on a '97 Marlin, and has a crack that opened up from over tightening, and had the toe chipped off the stock and buttplate.

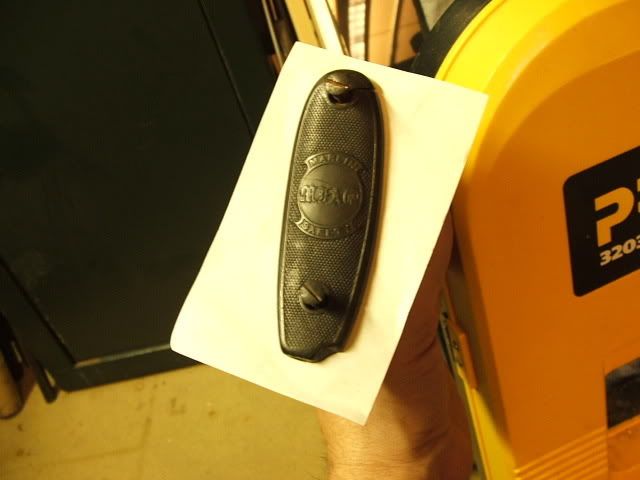
First thing I do is remove the buttplate and fill the chipped toe of the wood by filing it flat, cutting a piece of similar wood, gluing it in and reshaping to match. Next I reinstall the old buttplate with a sheet of thin paper sandwiched between the buttplate and the stock:

Next mix up Brownells Acraglass Gel in equal parts. It comes with black and brown dye, so mix appropriately and color. Use just a tiny pinpoint amount of each color and add as needed to get more brown or black:


Now mask off the edges of cracks or repairs, so the gel wont have to be removed or sanded off places you don't want epoxy on. Once you've masked it off, apply the gel. I like popsicle sticks, as they are free and easy to get, plus I get to eat popsicles with my grandaughter!:


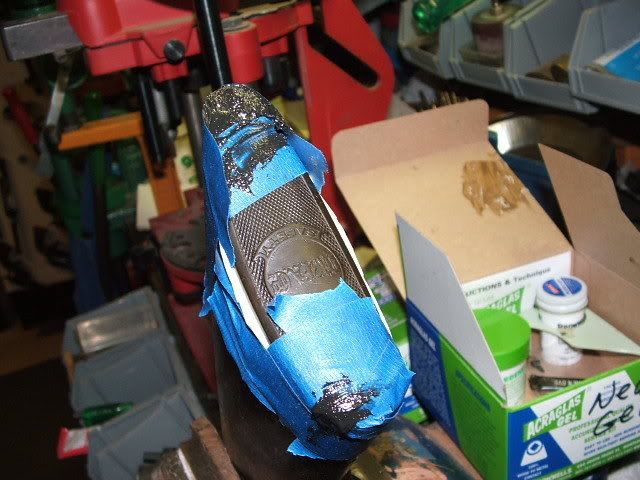
I build a dam around large repair areas like the broken toe, and make them slightly oversized so I can file and sand it down to fit the wood. Once the gel is applied the small repairs should be fine to remove the tape while wet, but those larger areas need to be left to dry, so they hold the gel until firm:


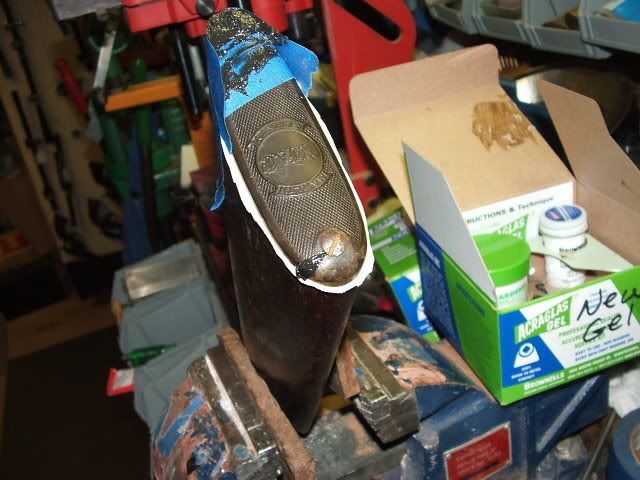
When the gel has thoroughly dried the tape is removed. Don't worry that it sticks to the Gel, as the tape and excess gel will be filed off together. Remove the paper from under the plate, which will also stick, but that can be sanded off also:


Next, the steps to finishing off the buttplate to fit the stock, and then touching up the checkering, etc. to make it look close to original!

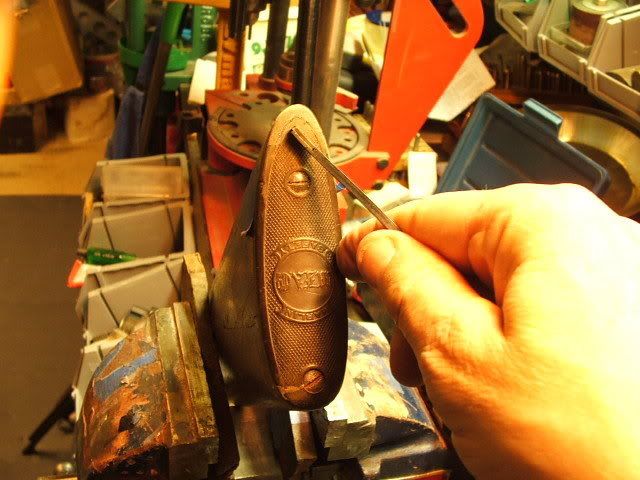
After a day's wait, the Acraglass is set and time to start working the excess down. Best done with the buttplate in place, as they are fragile and it helps hold it. Mask off the wood with blue painter's tape first, then use a coarse rasp to get close, then a fine file, and finally a bit of sandpaper. The buttplate will appear lighter when it's first sanded, but the finer the sandpaper, the darker it gets. This is roughed into general shape:


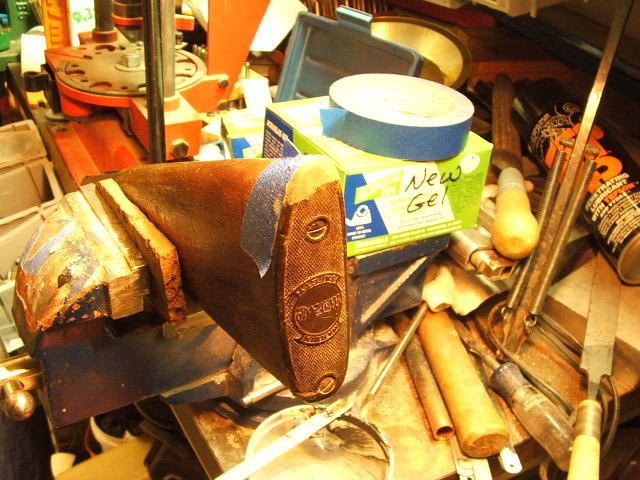
Next work it down close with 240 grit, and then 400 grit. I then use a pencil to draw the outline, and a dental pick to scribe the edge in:


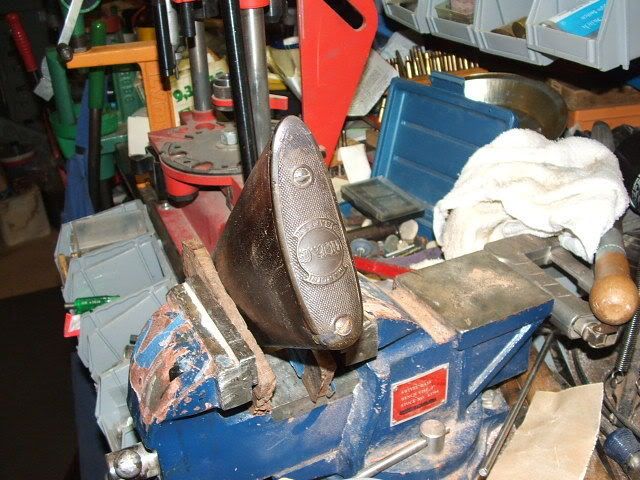
Once you've got the general outline, then follow existing checkering pattern to extend the lines into the repair. Don't try to get it looking like new, as the toes of well worn buttplates are almost smooth over years of wear:


After the pattern is checkered, a piece of polishing paper, or 800 grit will take the newness off the checkering. I then polish the buttplate with some paste wax, and if needed I darken it using a felt pen and wipe it with a rag to take any excess color off:


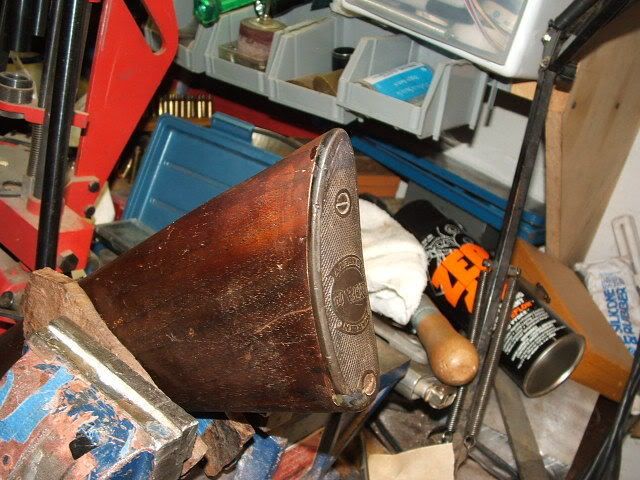
That's about it. The stock on this one will get darkened back to match with some Tapadera stain, and then a quick wipe of Wipe-On Poly to bring the finish up on the repaired toe. A little on the buttplate will make it look perfect too.

Tuesday, February 24, 2009

How I Make Paper Cartridges by "Coyote Nose"

I've gotten several inquiries as to how to make paper cartridges for percussion revolvers and have referred folks to various books. Now "Coyote Nose" has authored a description of his method and taken the accompanying photographs.

I get quite a few questions at the range on this, figured maybe you guys would be interested in one way to make paper cartridges for cap and ball revolvers. First a preview:

The gun is a 3rd gen Colt 1851. I just love this gun and the wood is absolutely outstanding. That's the way it came from the factory too! To the left of the case is Pyrodex, a wood block, paper printed with the label I use to wrap, and the round balls. On the lid of the case is the cigarette papers I use, the wood form to roll the papers with, completed cartridges, and a filled cartridge box. You must make the form by turning a 1/2" dowel on a lathe or drill press. I put a 7 degree taper on mine.

First lick the gum on the paper and roll it around the form. I cut the tail to about 1/4" long with scissors then lick the tail and fold it back onto the form. Slide it off the form to dry. A note on paper. Tops brand is too thick, I get too many misfires or hang-fires with it. Zigzag seems to work the best for me...it is real thin.
This picture shows the paper rolled on the form

After the paper tubes are dry (only a few minutes) I charge them up using the flask...mine throws the equivalent of 18 grains blackpowder, but I use Pyrodex P. Then drop a ball in each, twist the top..the tighter you twist it the sturdier the cartridge becomes, but don't over twist or it will rip. Experiment a little. Then using cotton or linen thread (not nylon!) tie the ends off.

A note on tying, if the cartridges are not for shooting but for display, I tie them the way old ones were: 1 loop under the ball, then take the thread up over the ball and tie off the twist. This bottom loop under the ball stops powder from migrating up over the ball. It is time consuming and I found it is not necessary if I twist the top tight to push the ball in, as the taper of the tube causes the ball to seal the powder off tightly. Still, if they are to be handled as when showing people it is best to put that loop under the ball. The picture shows 3 tubes with powder only, 3 with ball seated, 3 with the top twisted, and 3 with the thread tie on top. The loose ends and the excess paper above the twist will be trimmed off with scissors.

You can take these out in a plastic ziplock bag or any other container, but after several years of this I wanted something more historical, so I printed up a label and with the computer printed them out on colored paper. I made wood blocks with 6 holes in them (blind holes, block dimension is 1/2" + X 1 1/2" X 3") Wood is basswood. Glued a strong thread on one end to help in ripping the paper wrapping open, cut out the labels and form them over the wood. Glue only the paper to itself, not to the wood since every time you use a pack you simply glue a new paper wrap on.
Shown here are completed cartridges, paper wraps, completed cartridge packs, and the wooden holding blocks.


In use I rip open the pack clear across the top which allows me to dump out the cartridges, then either load them normally, paper and all, or rip open the back end and dribble a little powder in first then seat everything normally. If I don't rip the back end then before capping I use a long wire or pick and pierce the paper from the nipple. Doing one of these 2 I have never had a misfire or hang-fire using thin Zigzag paper. If I don't do this I never had a misfire but have had a small amount of hang-fires so BE CAREFUL. using other thicker papers I have had both misfires and hang-fires. I have both greased over the cartridges and also fired them w/o grease. Normally I use wonder wads but they don't lend themselves to these type of cartridges so I recommend grease over the top. Very rarely is paper left in the cylinder after firing. I mean rarely...I can't remember the last time it happened but you should check anyway to make sure nothing smoldering is left in there.

Also, when the ring of lead is shaved off when seating, often the very top of the paper comes off with it...no big deal as it does not seem to affect anything. I mainly use these in the winter when my fingers are frozen and I don't feel like messing with powder flasks, loose balls, etc.

Saturday, February 21, 2009

The Why of Guns In America

I wish I could write half this well and he completed the essay in just 90 minutes! Well, it is easy to write quickly when one knows the subject well. I think he's pretty much got it and you should read Guns in America: Why? by Randy Cassingham.

Friday, February 20, 2009

Gun Safes

I was looking into my safe a while back and wondering how I was going to fit gun in there. The idea that I might need another safe crossed my mind... Maybe I need a better safe.

Gun Safes are a recurring topic on all the gun forums. Even many of us "old" timers who can remember when high security was a lockable glass front cabinet now have as good a safe as we can afford. The questions usually revolve around fire-protection, capacity, resistance to forced entry (the reason for any safe), and cost. Secondary concerns to most include weight and the related ease of installation (or removal for those who move often) while remaining resistant to illicit removal. For some, the ability to hide the safe for aesthetic reasons is also important.

Fire-protection is something that has been discussed ad naseum. It seems that every brother and his cousin has a differing opinion as to the relevance of fire protection, the time a safe must be resistant to what temperature to be effective, and whether all that will matter in a fire with the fire-fighters pouring thousands of gallons of water on the flames and your safe! I suggest reading and re-reading the manufacturer's specifications to understand what you can expect from any given model.

Where that safe will be in your home has got to be important as well. Currently, my safe is on the second story of my home. If we have a catastrophic fire it will likely drop 2 stories to the basement. That alone can't be good for the guns inside. Having the gun safe "pre-positioned" in the basement isn't a good option either as no home's sump pump can handle the amount of water put on the fire. Likely the basement will become a large pool, at least for a while. With the safe on an upper story the contents have some small chance of surviving the firemen's shower. Those who are able to set their safe on a ground level slab might have the problem licked.

You can never have too much capacity, ok, you can but many of us underestimate how big a safe we need. Some of the layouts don't allow packing our particular firearms that tightly together or for but so many longer than average guns. I've yet to meet anyone with a safe who says they wish they had bought a smaller model. Most do wish for a larger safe. The larger safe might not be easy or easy enough for the owner to move but it is more cost effective than two or more safes. So how big?

Well, my first safe was a Treadwell horizontal or chest type. It came with a rack for 12 long guns and has some room at one end for the storage of additional items. I have my handguns, in plastic storage cases factory issue or otherwise as necessary, stacked there. I had guns resting on the racks between other guns to up my capacity but this wasn't ideal.

There's one other practical matter as well. How do you tell your wife that you've accumulated so many guns that the gun safe she bought you that was "big enough for me for the rest of my life" or some such is too small and that you need a second safe? How do you justify that rather large purchase given that you may not be discussing your hobby with your partner. Unfortunate, yes, but uncommon? No. I don't have any ideas about that. Maybe you should just give up and confine yourself to but so many guns...

Here are some Safe/Vault manufacturers/brands


You might also like to watch this video from Rogue Safe Company...


And this excellent post at AR-15.com

Linebaugh Seminar Dates for 2009

Carthage, IL - May 22-24 - contact Todd Corner (309) 458-6464

Union City, TN - May 29-31 - contact Jamie Spalding (731) 536-6590

Borger, TX - June 5-7 - contact Ronnie Johnson (806) 418-3202

Cody, WY - June 12-14 - contact John Linebaugh (307) 645-3332 (shop) or (307) 899-0574

Wednesday, February 18, 2009

Lipsey's Exclusive, the Ruger Blackhawk Flattop .44 Special


Well, somebody must have spoken up for me as a 5-1/2" gun is headed my way. Might have it by this weekend. Guess I need to get loading!

I would rather have the 4-5/8" gun but will just have to wait... Yes, I've been accused of being a whiner. That's fine.

Tuesday, February 17, 2009

Nylon 66 Field Stripping and Cleaning

Just cock the gun and put the safety ON (THIS IS IMPORTANT!!!), remove the feed tube, pull the bolt handle straight out of the side of the gun, take out the two receiver cover screws and lift the receiver cover off (No parts will fly off when this is done...), loosen the barrel retainer and raise it up enough to slide the barrel forward and out of the stock, loosen the barrel retaining screw all the way and lift the barrel retainer out of the stock, then slide the bolt forward and out of the receiver / stock and you're done. Clean and re-assemble in reverse order.

A little background. In the 1960s Remington produced a line of synthetic stocked autoloading, lever action, and bolt action .22 rifles. Remington nylon stocks were made of a DuPont Nylon 66 series plastic called structural Zytel-101 that Dupont developed specifically for these rifles. (Remington Arms was then owned by DuPont.) They were advertised to not warp, crack, chip, fade, or peel for the life of the rifle.

Designed by W.E. Leek, C.H. Morse, and H.W. Young and introduced in 1959, the most successful and best known of the Remington Nylon series was the Nylon 66. It is a blowback operated, tubular magazine fed semi-automatic rifle chambered for the .22 Long Rifle cartridge. This rifle's receiver was actually nylon and the bolt ran on "self lubricating" nylon rails. The Owners Manual advises not to lubricate the action with gun oil. There is a blued sheet steel cover used to give the receiver a more normal appearance and a 19-5/8" barrel. The brass tubular magazine, which hold 14 cartridges, is in the butt stock of the rifle and is loaded through a recess in the plastic buttplate. The whole gun weighs only 4 pounds (empty).


Links:
- NylonRifles.com Everything about the Remington Nylon Rifles!

Saturday, February 14, 2009

British Gear Has a New Site

Owners of British military firearms often find themselves lured into the, for Americans, relatively esoteric world of British military equipment. Knowing what is and isn't a correct acouterment to accompany your British rifle, pistol or revolver can be important to you. We were pleased to discover today that there is a web presence that can help you sort through such puzzles.

The Karkee Web has or will have the information you seek.

● The Development of the Mills Woven Cartridge Belt 1877 - 1956
● Bandolier Equipment, Pattern 1903
● Web Equipment, Pattern 1908
● Web Infantry Equipment, Pattern 1913
● Infantry Equipment, Pattern 1914
● Infantry Equipment, Australian Pattern (Leather)
● Web Equipment, Naval, Pattern 1919
● Web Equipment, Pattern 1925
● Web Equipment, Cavalry, Pattern 1940
● Contributors to Karkee Web
● Links
● Bibliography & Reference Material
● Site Development Notes

Now, go forth and satisfy your curiosity!

Friday, February 13, 2009

Thursday, February 12, 2009

Google Earth

While Google might be trying to monopolize computers we can still take advantage of them for now. Google Earth is extremely interesting. Here's some interesting coordinates, have you got more?

52.069207,4.3139865
44.244273,7.769737
10.903497,19.93229
50.010083,-110.113006
-18.529225,-70.25002
33.225488,-111.5955
33°19′37.28″N, 44°17′4.78″E
33*20`18.93″N, 44*22`40.93″E
35°9′20.89″N, 129°8′49.49″E
52°1′44.67″N, 4°17′20.73″E
52.336392,-0.1953462
33.892351,151.27538

Skunks and the Demon Odor

Demon odor is what one former neighbor lady called it. She must have known as her dog was not a fast learner! Let's face it though, if you have dogs, you will have to deal with skunk odor sooner or later.

When driving down the road we'd just say, "think lemonade!" Lemonade is close enough in smell that you'd kinda forget the bad implications of what you were really smelling. Maybe it is conditioning but the lemonade "trick" works for me.

While that works for the momentary exposure along the highway, it doesn't work when the odor permeates the house. That can get a bit rugged even if you have somehow acclimated yourself to the scent. Many folks say that tomato juice will neutralize the odor. Never did for me.

A better decontamination formula is this formula
For pets that have been sprayed, bathe the animal in a mixture of 1 quart of 3% hydrogen peroxide (from drug store), 1/4 cup of baking soda (sodium bicarbonate) and a teaspoon of liquid detergent. After 5 minutes rinse the animal with water. Repeat if necessary. The mixture must be used after mixing and will not work if it is stored for any length of time. DO NOT STORE IN A CLOSED CONTAINER - it releases oxygen gas so it could break the container. This mixture may bleach the pet's hair. (Paul Krebaum's Recipe from Chemical & Engineering News , October 18, 1993, p. 90).

This seems to work a slightly lighter hue of hair not withstanding...

As we approach spring and the slightly higher probability of running into one of these odifurous animals dog owners might want to print this out and have the components on hand. Just sayin'...

Tuesday, February 10, 2009

Lipsey's Exclusive, the Ruger Blackhawk Flattop .44 Special

These are out and getting into the hands of shooters. Lots of folks have one, or more, but my dealer can't get one. That means I can't get one. Seems to me I ordered early on but apparently I couldn't order early enough or my dealer is too low on the food chain to deserve to get one.

I'm not too proud to ask that if you are an employee of Lipsey's or have some pull with them you might, pretty please, ask them to ship a 4-5/8" .44 Special Flattop to Nuckols Gunworks of Staunton, VA...

Monday, February 09, 2009

Jesse Ocumpaugh now has a web site...

Jesse Ocumpaugh of Cottage Grove, OR has been re-boring rifle barrels for a while now. He's finally got a website which will make it easier for many of us to remember how to contact him. His work is good and I know of several of his .30-30 barrels which were re-bored and re-chambered to .38-55 Winchester and all shoot well.

Speed Strips, now for more than just .357/.38...


Thanks to the CylinderSmith for this lead. Tuff Products now has the Speed Strips for both the .44 & .45 cartridges and .50 cartridges. You can even get a "bonus pack" with two strips of every size. Only $8.49 for a pack of two (any size) and they will ship these first class (if you are willing to wait a bit). I've placed my order.

********
My order arrived today, 2/13/09.  These speed strips give every appearance of being fully as good as the Bianchi product.  These are made in China. 

Sunday, February 08, 2009

Marlin 1894 .44 Magnum Carbine

Years ago, just after I turned 18, I bought a Winchester 94 in .44 Magnum. A standard carbine, post-64 of course, that was a pretty good gun but sometimes the cartridge stop would let a cartridge in under the carrier. I'm telling you, that is a nasty jam to clear in the field. It happened enough that I traded it in on another .44 Magnum, a Marlin 1894!

Now this was a good gun. I immediately installed a Williams Foolproof receiver sight and took some of the ammo that I'd used in the Winchester with the new rifle and went to the range. Sometimes I could manage to put 3 rounds of the old Remington half-jacket SWC load into a cloverleaf. It sure shot well. I didn't actually get to hunt with it until after my first tour in Korea.
I was stationed at Fort Hunter-Liggett in California and lived in Greenfield, CA. Needing a combination of self-defense and a hunting gun, I asked Dad to send the Marlin out to me. That Marlin fed a few of us as I loaned it out for hog and goat hunts on Fort Hunter-Liggett. We used the Remington 240 gr. SJHP load exclusively. That load was both relatively cheap and effective.

When I came back to Virginia that gun went hunting for whitetails a couple of times but one day I had to sell it to raise money and it went to LBW Shooter's Supply in Staunton for cash. What a silly thing to do. I felt really badly about that decision.


I have felt very stupid for having gotten rid of that good gun and so I got another. My friend was looking for money and had this gun and he brought it to me. A deal was arranged and I have this good gun just like the old one!

Saturday, February 07, 2009

Clinging to Guns

A politician, now the President-Elect, made a statement about people clinging to God and their guns. Clinging has a specific semantic implication of desperation. I suppose that in some degree that politician was correct. Free men everywhere are strongly for the right to arm themselves particularly when they are being attacked and vilified and even persecuted by others. The Jews of Europe failed in doing this and they were killed by the millions. We have seen this persecution of people who adhere to the original values of this country, the values of hard work, independence/self-reliance, and family, for quite a while now. We've seen them attacked by "do-gooders" who thought that it was impossible for a reasonable man to choose to drink in moderation. These people have spread their belief in their God-like omniscient wisdom to firearms, knives, drugs (which they use themselves), child-raising, energy use, tobacco, automobiles, even to choice of homes and methods of communication.

Well, now is the time to start clinging.  Contact your representatives and OPPOSE HR45, Blair Holt's Firearm Licensing and Record of Sale Act of 2009 To provide for the implementation of a system of licensing for purchasers of certain firearms and for a record of sale system for those firearms, and for other purposes. Tell them that you absolutely OPPOSE ALL forms of gun control.